August 22, 2009

Summer Lovin’

I love to cook but I love summer too so during this wonderful time of year, I try to spend as little time as possible in the kitchen so as to enjoy every minute possible outside (hence the lack of posts). When I do finally get in the kitchen, I like to enjoy summer’s bounty at its best--in its natural state--which doens't require much effort and it brings out the best flavor. This recipe is a perfect lunch or dinner entree on those beautiful days that you don’t feel like cooking but are in the mood for summer’s finest.

Nectarine and Avocado Summer Rolls


1 nectarine, thinly sliced
1 avocado, thinly sliced
1 large handful baby spinach or other salad greens
1 breast of chicken, grilled and thinkly sliced or shredded (or 1 breast of a rotisserie chicken, shredded)
8 fresh Basil leaves
¼ cup almond butter (or peanut butter)
2 teaspoons soy sauce
2 teaspoons rice vinegar
2 teaspoons maple syrup
dash each salt and pepper
rice paper wrappers

Make the Almond sauce by mixing together the almond butter, soy sauce, rice vinegar, maple syrup, and salt and pepper. Set aside.

Meanwhile, in a large microwave-safe container, heat about 1 quart of water until just about boiling. Soak a rice paper wrapper in the water and then remove from water, place on counter top and layer the (1) Nectarines, (2) avacado, (3) Salad greens (4) Basil and (5) Chicken in the bottom half of the wrapper. Drizzle a generous tablespoon of the sauce over the ingredients and wrap the wrapper, starting from the left and right sides then from the bottom up. (Similar to rolling a burrito). Contunue with another rice paper wrapper. Serves 4.

Serve as an appetizer at a cocktail party or as an entrée alongside jasmine rice cooked in coconut milk. Make these vegetarian by substituting more veggies for the chicken.

April 21, 2009

Inside-Out Enchiladas Verdes


Green Enchiladas usually come with green salsa on top but this recipe switches things up a bit and puts the greens on the inside. If you haven’t tried Swiss Chard, this recipe is a great way to try a healthy, new vegetable. If you are already a fan of chard, try this as a vegetarian way to satiate your cravings for South of the Border flavor.

Swiss Chard Enchiladas


2 teaspoons Extra Virgin Olive Oil
2 Garlic Cloves, peeled and chopped
1 medium onion, diced
1 Large bunch Swiss Chard, leaves and stems separated. Coarsely chop the leaves, finely chop the stems.
1 Tablespoon Butter
1 Tablespoon Flour
½ Cup Milk
½ Cup Cheddar or Monterrey Jack cheese, grated (or a combo of the two)**
6 Corn tortillas
½-1 Cup Salsa
Salt and pepper
¼ Cup Sour cream (optional)
Fresh Cilantro (optional)

Preheat the oven to 375 degrees. Heat the oil in a medium-sized sauté pan over medium-high heat. Sauté the onions and garlic until slightly softened and fragrant, about 3-4 minutes. Remove the onions and garlic from the pan and place them in a medium-sized mixing bowl. Add the chard stems to the heated sauté pan and cook over medium-high heat, stirring occasionally until they are soft (about 2 minutes). Add the chard leaves (in small batches) until they are cooked down significantly (about 2 minutes per batch).

Meanwhile, make the cheese sauce. Melt the butter in a small pot, stir in the flour, and when you have a dry paste, slowly add the milk then cheese. Stir until all the cheese is melted, then pour most of the cheese sauce into the cooked greens. Fill the center of each tortilla, then roll them up, place them seam side down in a baking dish that has been coated lightly with non-stick cooking spray. If using the sour cream, mix it into the salsa, and if not, just spread the salsa over all the filled and rolled tortillas and bake for about 15-20 minutes.

Sprinkle with the fresh cilantro and serve with a Corona.
**Chef's Note: I once used slices of White American Cheese instead of the Jack and Cheddar and the sauce was still really good.

April 18, 2009

Soup de la Casa

I love soup. To me a day is not a day unless I have soup for lunch and when you’re eating all that soup, you need a little variety in flavors. I came across this recipe and thought it would be a perfect way to add some spice to the daily grind.

When looking this over, DON'T judge a book by it’s cover. This soup may not be photogenic, but it’s a great blend of flavors--old and new, and north and south. It’s well worth the minimal effort and don’t worry, it looks a lot better in person!

Spicy Split Pea Soup with Chorizo
Adapted from Bobby Flay Cooks American


1 Package Chorizo Sausages
1 Medium Onion, finely diced
2 Stalks Celery, finely diced
2 Large Carrots, finely diced
2 cloves garlic, finely diced
5 new (red-skinned) potatoes, finely diced with skin on
2 Poblano Peppers, roasted, peeled and finely diced
2 Cups Split Peas
8 Cups Chicken or Vegetable Broth
salt pepper to taste
Sour Cream and Fresh Cilantro for serving

In a stock pot, sauté onions, carrots and celery in a little oil or butter for a few minutes until softened. Add potatoes and peas and water. Bring to a boil and let simmer for about 45 minutes until peas are falling apart.

Meanwhile, cook the chorizo. Preheat a sauté pan over medium-high heat. Add a drop or two of oil and place Chorizos in the hot pan, turning occasionally until browned on the outside, about 5 minutes. Add ¼ to ½ cup of water to the sauté pan and cover, allowing the sausages to cook through, about 10 minutes. Once the water is absorbed and the chorizos brown again slightly, remove from heat and drain on paper towels. Dice the chorizos and then set them aside.

Cook the peppers. If you have a gas stove, place peppers directly on burner set to medium-high heat and turn occasionally until pepper skin is a charred, solid black color. If you don’t have a gas stove, broil peppers in oven, turning occasionally.

Once the peppers are black all over, place them in a plastic freezer bag and let them steam for about 15 minutes. Remove the peppers from the bag and remove the burned skin. It should rub right off. Discard the stem and seeds too.

Once soup is finished, stir in the chorizo and the poblanos, and ladle into bowls. Top with a dollop or sour cream and some chopped fresh cilantro.

It’s not a Cookie, it’s a Fig ……Pizza?

The Husband and I are obsessed with Pizza. He likes to follow tradition, but once in a while, I veer him very far off of the trail of tradition. On this most recent treck, we were both glad that we took the road less taken. The dinner only took about 40 minutes from start to finish but once you have a small batch of fig spread ready, this pizza is a 15 minute meal. A perfect weeknight treat!

Fig and Three Cheese Flatbread Pizza


2 Store-bought Naans or other Flatbreads
Fig Spread (Recipe Below)
Blue Cheese, Crumbled
Goat cheese Dollops
Parmesan, Grates
Sliced red onions
Salami or Pepperoni Slices
Chopped fresh parsley

Preheat the oven to 400 degrees. Spread the desired amount of fig spread on the flatbreads and top them with the cheeses and toppings. Bake for about 10-15 minutes until cheese is slightly melted and flatbreads are crisp.

Fig Spread
1 10-oz Package Dried Figs
1¼ Cup Water
up to ¼ cup Sugar, if desired ( I don’t think you need it)
1 Tablespoon Lemon Juice
1 pinch Salt

Remove the stems from the figs and slice the figs into quarters. Add the sliced figs to a saucepan and add the water and the sugar, if using. Bring the figs to a boil over medium heat and let them simmer for about 20 minutes, stirring occasionally. Once almost all of the water is gone from the pan, remove the figs from the heat and let them cool slightly. Add the figs, lemon juice and salt to a food processor bowl and process on high for about 2 minutes, adding water as needed until the mixture is the consistency of jam. Refrigerate for up to 4 weeks.

Use the Fig Spread on toast or a sliced baguette, top crackers and brie with a dollop, or slather it on a flatbread and make a Fig and Three Cheese Flatbread Pizza.

March 16, 2009

3.14159265 Day


While hundreds of budding engineers and scientists were reciting the millions of digits of Pi on Saturday, 3/14 (aka Pi Day), I hosted my own little "Pie Day" Celebration and baked a Lemon Chess Pie with the help of my sister who was visiting for the weekend.

No one really knows the origins behind the name “Chess Pie” and there is no other way to describe this pie other than by saying that it tastes like a like a cross between crème brulee, lemon meringue pie and egg custard pie. No wonder this is reportedly one of Bill Clinton’s favorites.....it’s one heck of a ménage trios!

Lemon Chess Pie

1 (9-inch)refrigerated pie shell (or make your own)
1½ cups sugar
½ cup butter (one stick), softened
5 eggs, beaten
½ cup milk
1 Tablespoon all-purpose flour
1 Tablespoon cornmeal
¼ cup fresh lemon juice
3 Tablespoons lemon zest

Preheat oven to 350. In a large mixing bowl, cream together sugar and butter or margarine until light and fluffy. Beat in eggs and milk. Add flour, cornmeal, lemon juice, and lemon zest. Mix until smooth. Pour mixture into pastry shell and bake in the preheated oven for about 45-50 minutes, until the pie is set in the center and the top of pie is slightly-browned. Let the pie cool before slicing it.

March 08, 2009

Tossing a Salad and Other Fun Kitchen Activities

Spring Break is right around the corner so I’ve been working on getting bikini ready. I’ve been exercising more but have also been eating smarter in hopes of losing those last few pounds of winter weight before I head to Mexico and gain them all back.

In order to lose those last few pounds, I’ve replaced a few traditional dinners of meat, starches and vegetables with some amazing dinner salads. The veggies are great but only because they are dressed to the nines with some of my favorite vinaigrettes.

These dressings are so easy are much better tasting (and better for you) than those additive-laden store bought varieties. Make double batches and keep some in the fridge for up to two weeks.

Dinner Salad with Maple-Balsamic Vinaigrette and Pan-Seared Sea Scallops


In this salad: Baby Spinach, Cherry Tomatoes, Sliced Red Onions, Red Bell Pepper Strips, Carrot Ribbons, Sliced Mushrooms, Gorgonzola Cheese Crumbles, Pecan Pieces and Dried Cranberries.

For the Scallops: Dry each scallop completely with paper towels and then sprinkle with a dash of freshly ground pepper. Heat a sauté pan on medium-high and add about a teaspoon of Extra Virgin Olive Oil. When oil is hot, gently place the scallops in the pan, careful not to put them too close to each other. Let them cook on one side for 3-4 minutes without moving them (set a timer and back away from the stove or you won’t get the caramelization!). Using a metal spatula and/or tongs, flip them and then let them cook for another 1-2 minutes. Add to a salad tossed with maple-balsamic vinaigrette.

Maple-Balsamic Vinaigrette

½ cup tomato juice (or ¼ cup tomato paste and ¼ cup water)
1/3 cup Balsamic Vinegar
¼ cup real Maple Syrup
1 Tablespoon fresh Rosemary, Minced
2 teaspoons Dijon Mustard
½ teaspoon kosher salt
½ teaspoon fresh ground pepper
2 garlic cloves, minced
2½ Tablespoons Extra Virgin Olive Oil

Combine all ingredients except oil, stirring well. Gradually add oil, stirring constantly with a whisk until well combined.

Tossed Salad with Herbed Vinaigrette


In this salad: Baby Spinach, Cherry Tomatoes, Sliced Red Onions, Baby Carrot Coins, Blue Cheese Crumbles, Pine Nuts and Dried Cherries.

Herbed Vinaigrette
¼ Cup tarragon vinegar (or white wine vinegar and 1 Tablespoon Dried Tarragon)
4 teaspoons sugar
1 Tablespoon Dijon Mustard
2 cloves fresh Garlic, Minced
¼ teaspoon Kosher salt
¼ teaspoon freshly ground black pepper
¼ teaspoon dried basil
¼ teaspoon dried oregano
1/8 teaspoon fresh rosemary (or ¼ dried rosemary)
3/4 Cup Extra Virgin Olive Oil


Combine all ingredients in a large bowl. Mix with a whisk until sugar and salt are dissolved. Slowly drizzle in the oil while continuing to whisk. Mix until vinaigrette thickens.

A little bit goes a long way with this dressing. Gently drizzle about a tablespoon or two over a bowl of mixed greens and other fresh chopped veggies and toss until all ingredients are lightly coated. Serve with a piece of naan to round out the meal.

February 02, 2009

Hello Cupcake!

We’ve been eating so healthy since New Year’s Day but we needed a break from all the salads and grilled chicken so we decided to go all out for Super Bowl Sunday.

We made the usual (stuffed jalapenos, pigs in a blanket, Carolina pulled pork, Queso Dip, etc.) but the real stars of the evening were the Carrot Cake Cupcakes. Everyone was stuffed by half time but somehow we all had room to do some major damage to the 2 dozen cupcakes I baked.

Keep in mind that this is a very easy recipe to half if you're watching your calories and can’t commit to 24 cupcakes.


Carrot Cake Cupcakes with Cream Cheese Frosting
2 cup all-purpose flour
2 cups sugar
1 teaspoon baking powder
1 teaspoon baking soda
1 teaspoon ground cinnamon
3 cups finely shredded carrots (about 4 large carrots)
¼ cup vegetable oil
4 eggs

Cream Cheese Frosting
1 8-oz package reduced fat cream cheese, softened
½ cup butter (1 stick), softened
1 teaspoon vanilla
3½ to 4½ cups powdered sugar

For the Cupcakes:
Preheat oven to 350 degrees. Grease two 12-cup cupcake pans (use cooking spray if you prefer).

In a large mixing bowl combine all the ingredients (flour, sugar, baking powder, baking soda, and cinnamon carrots, oil, and eggs) and beat with an electric mixer until all ingredients are combined. Pour the batter into the prepared pan(s).

Bake for about 25 minutes or until a wooden toothpick comes out clean. Cool on wire racks for 10 minutes and then remove cupcakes from pans. Cool thoroughly on wire racks. Frost with Cream Cheese Frosting. Cover and store in refrigerator.

For the Cream Cheese Frosting: Beat together the cream cheese, butter, and vanilla until light and fluffy. Gradually add 2 cups of the powdered sugar, beating well. Gradually beat in enough of the remaining powdered sugar to reach desired spreading consistency.

December 16, 2008

Brie is Proof That God Loves Us and Wants Us To Be Happy

I love brie cheese so much that I normally can't make any recipes with it because I usually end up eating it prior to cooking with it. However, for a recent get together, I used all the willpower I had and didn't eat the brie right out of the fridge so that I could make a baked brie appetizer.
My baked brie looked a little ugly because I was impatient with the puff pastry, but the looks are more than made up for in the gooey, sweet, savory, perfect flavor!

Baked Brie


½ Package (i.e., 1 sheet) Frozen Puff Pastry
1 egg
¼ cup dried cherries or cranberries chopped into tiny pieces
¼ cup toasted pecan pieces
¼ cup honey
½ teaspoon chopped fresh rosemary leaves (or 1 teaspoon dried rosemary)
1 teaspoon hot water
1 small- to medium-sized round Brie cheese

Thaw the pastry sheet at room temperature until it's easy to handle (about 1 hour).

Preheat the oven to 400 degrees. When defrosted, unfold the pastry sheet on a lightly floured surface and roll the pastry sheet with a rolling pin to seal any cracks in the pastry that may have occurred if you were impatient and unfolded it before it was ready (like I did). Be sure to roll it well (not like I did) if you want it to look pretty.

Stir the diced cherries or cranberries, pecan pieces, honey, rosemary and hot water in a small bowl. Spread the cherry mixture into the center of the pastry square and then top with the cheese round.

Beat the egg in a small bowl with a fork and then brush the edges of the pastry with the egg.

Begin wrapping the pastry over the cheese, trimming the pastry as needed to avoid too much dough in one place. Press the edges together to seal the pastry. Place the wrapped cheese seam-side down on an ungreased baking sheet and then brush the pastry with the beaten egg. If desired, decorate the top with pastry scraps (don’t forget to brush the decorations with the egg.)
Bake for 20 to 25 minutes, or until the pastry is deep golden brown. Let stand for 45 minutes to 1 hour. Serve with crackers or thin slices of French bread.

Cowboy Caviar: A Little Work, Alot of Flavor

I love having company over but I hate being stuck in the kitchen when I would rather be visiting with friends and family so I rely on some easy make-ahead appetizers to keep everyone happy and "unhungry" when they come over for an afternoon visit.


One favorite I rely on is my black bean dip, affectionately named, Cowboy Caviar. It's super easy and is always a big hit at home, at tailgates and at potlucks. Give it a try at your next gathering....

Cowboy Caviar*


1 8-ounce package cream cheese
1 15-ounce can black beans, rinsed
1 small can chopped olives, drained
1 small onion, diced
1-2 teaspoons vegetable oil
1-2 teaspoons lime juice
¼ teaspoon salt
¼ teaspoon cayenne pepper
¼ teaspoon ground cumin
¼teaspoon chili powder
¼teaspoon garlic powder
¼ teaspoon black pepper
½ cup tomatoes, diced
½ cup Monterrey Jack or cheddar cheese, grated

Spread the cream cheese onto bottom of a serving plate (a 9 inch pie or quiche plate works nicely). Meanwhile, mix the beans, olives, onions, lime juice, oil and spices together and spread evenly over the cream cheese. Top with the diced tomatoes and Monterrey Jack cheese and garnish with chopped green onions, if desired. Serve with tortilla chips.

*Make at least 2 hours in advance of serving so flavors have time to meld.

December 08, 2008

Recession-Friendly Hostess Gift

It’s that time of year again—which means parties, parties and more parties. Yay!! But all those bottles of wine we've been bringing to the hostesses have really begun put a dent in our Christmas fund, so when an invitation arrived in the mail the other day, I vowed that instead of dropping more cash at the liquor store, I would take the time to make a nice homemade gift to bring the hostess. I chose to make caramel popcorn and put it in a pretty Christmas tin.

It was so easy and sooo budget friendly-I hope the host and hostess liked the treat halfway as much as the Husband and I liked celebrating the season with all our friends on Saturday night.


Caramel Popcorn

½ cup butter
1 cup light brown sugar
¼ cup corn syrup
½ teaspoon salt
¼ teaspoon baking soda
½ teaspoon vanilla extract
10 cups popped popcorn (from 2/3 cup kernels)
Optional ingredients:
1/2 cup dry-roasted peanuts
1 to 2 1-Oz. semi-sweet chocolate baking squares
1 to 2 1-Oz. white chocolate baking squares

Pop popcorn in an air popper or in a large pot over the stove top and set aside in a large bowl. Meanwhile preheat the oven to 250. Next, in a medium saucepan over medium heat, melt the butter. Stir in the brown sugar, corn syrup and salt. Bring the mixture to a boil, stirring constantly. Once the caramel mixture is boiling, boil without stirring for 4 minutes. Remove the caramel sauce from the heat and stir in baking soda and vanilla. Pour the caramel in a thin stream over the popped popcorn (and peanuts, if using), stirring gently to coat.

Place the coated popcorn in a large (or two medium) shallow baking dish(s) and bake in preheated oven, gently stirring every 15 minutes, for 1 hour. Remove from the oven and let cool completely. (For added sweetness, drizzle caramel popcorn with a tiny bit of dark or white chocolate or both!)

December 05, 2008

Don’t Let This Great Pumpkin Pass You By

It’s usually difficult for people to admit to their flaws, but I have no issues admitting one of mine: My pies suck. No matter how many times I try, no matter how closely I follow a recipe, they're simply inedible. You would think that with a mom who is known to “make the best pies in the world,” I’d be able to come up with something halfway decent but so far, I’ve had no such luck.

That’s why I was thrilled when I came across a recipe for a delicious pumpkin pudding. It’s basically a piece of pumpkin pie, without the baking, the hassle and for me, the disappointment. This pudding is also a relatively healthy way to end any fall or winter meal and the best part is that it can be ready in about 5 minutes.


Quick Pumpkin Pudding (inspired by Health Magazine)


2 cups pumpkin puree (fresh or canned)
¼ cup low-fat cream cheese
2 Tablespoons low-fat vanilla yogurt
2 Tablespoons honey
1 teaspoon pumpkin pie spice
½ teaspoon vanilla extract
Cinnamon, nutmeg, mint leaves and whipped cream for garnishing.

Combine all ingredients in a blender or food processor and process until combined. Add additional honey and spices to taste. Divide into 4 ramekins and garnish with cinnamon, nutmeg and mint leaf.

October 20, 2008

Is it possible to fall in love with food?

I love fall foods, especially, butternut squash. I also love cooking indulgent, yet easy meals on Sundays and making a dinner that covers both bases is exactly what I did last night. I made butternut squash risotto-a dish that was a huge hit and left both of us feeling a lot like George Costanza's date in that hilarious Seinfeld episode about the risotto she ate...........
mmmmmmmmmmmmmm mmmmmmmmmm mmmmmmmmm One bite and you'll be ready to move in! :)

Chef’s note: When you make this, you’ll be standing at the stove for a while so be sure to have a glass of wine close by before you start.

Butternut Squash Risotto


Caramelized Squash
1Tablespoon olive oil
1 Tablespoon butter
12/ large butternut squash, peeled, and diced into 1/4-inch cubes
Dash salt
Dash pepper
1 Tablespoon brown sugar

Risotto
1 Tablespoon olive oil
1 Tablespoon butter
1 Cup minced onion (I used red onions but white onions will be fine)
2 cloves garlic, minced
¼ cup dry white wine
4 cups chicken stock
1 cup Arborio rice
¼ cup grated Parmesan cheese
1 teaspoon chopped fresh parsley
Salt and pepper to taste

To gently caramelize the squash: Preheat your oven to 375 degrees. Melt the butter and oil together over medium heat in an oven-safe sauté pan. Add the squash cubes and season with a dash of salt and pepper. Cook, stirring occasionally, until the squash is slightly tender, about 4 minutes. Add the brown sugar and gently stir until the sugar is well-incorporated but not burning, about 3 minutes. Place the sauté pan in the oven and cook the squash for 10-15 minutes, until cooked through but not mushy. Set aside.

Meanwhile, to make the Risotto: Heat the oil in a large saucepan over medium heat. Add the onion and garlic and cook, stirring occasionally, until soft, about 4 minutes. Add the rice, stirring constantly, until the rice is coated with the oil and it turns a milky opaque white color, about 2 minutes.

Deglaze the pan with the wine, stirring constantly, and cook until the wine is completely reduced and absorbed by the rice. Slowly add about ½ cup of the broth at a time, stirring more or less constantly through each addition, until all the stock is almost completely absorbed by the rice. This should take about 20-25 minutes.

Remove the risotto from the heat and stir in the caramelized squash, the Parmesan cheese and salt and pepper to taste. Garnish with chopped parsley and prepare to be completely satisfied.

September 29, 2008

A Garden Grows in Baltimore

The Husband and I are huge chili aficionados, and a few years ago, we were lucky enough to be judges at the National Kidney Foundation’s Chili Cook-Off in Washington, DC. We tasted some mighty fine chili as judges and have been working on our winning recipe ever since. We almost have our wining recipe for red chili down pat, but since it’s not winter yet, we opted for a bowl of green chili last night to help use up the plethora of peppers I harvested from my rooftop garden.


According to the International Chili Society, green chili is only competition-worthy if you use only green chilies but I think purely green chili looks a little bland, plus it was impossible to time the garden harvest just right, so I used mostly green, but some ripened, red chiles in this dish.


The recipe is a little involved but the end result is totally worth it!

(Mostly) Green Chili
[Chef's Note: Don't overlook this recipe just because it's not that photogenic! It's really good.]


2 large boneless, skinless chicken breasts
Salt and ground black pepper
3-5 medium Jalapeño peppers (stems, seeds and white pith removed and cut into pieces)
3-5 Serrano pepper (stems, seeds and white pith removed and cut into pieces)
3 Poblano peppers (stems, seeds and white pith removed and cut into large pieces)
2 Anaheim or Cubanelle peppers (stems, seeds and white pith removed and cut into large pieces)
1 large sweet onion, cut into large pieces
3 cloves garlic
1½ teaspoons ground cumin
1 (14.5-ounce) can Cannellini beans, drained and rinsed
1½ cups chicken broth
1/3 cup masa flour (or 20 crushed tortilla chips)
Juice of one lime
¼ cup minced fresh cilantro leaves
Sour cream, scallions, lime wedges, fresh cilantro and fresh diced jalapenos for serving.

Wearing gloves or working very carefully, remove and discard the ribs and seeds from the Jalapeño, Serrano, Poblano and Anaheim chiles. In a food processor, pulse the chiles, onions and garlic for about 15-20 times. Set aside.

Meanwhile, season the chicken with salt and pepper. Heat enough olive oil to cover the bottom of a large pot over medium-high heat until just smoking. Add the chicken and cook without moving it until the outside is golden brown, about 3 minutes per side. Transfer the chicken to a plate.

Adding additional oil to the pot, if necessary, add the pepper/onion/garlic mixture and cumin to the pan, and reduce the heat to medium. Cover and cook, stirring occasionally, until vegetables soften, about 10 minutes.

While peppers are cooking, add ½ of the can of beans and ½ cup of broth to a food processor and process until smooth, about 20 seconds.

Add the bean/broth mixture, the remaining broth, the masa flour (or tortilla chips) and the seared chicken breasts to the pot and bring to boil over medium-high heat. Reduce the heat to medium-low and simmer, covered, stirring occasionally, until chicken is cooked through, about 20 minutes.

Stir in the remaining beans and continue to simmer, uncovered, until beans are heated through and chili has thickened slightly, about 10 minutes.

Using tongs, transfer the chicken to cutting board and shred it, or alternately, slice it very thinly.
Stir in the shredded chicken, lime juice and cilantro into the chili and return it to a simmer. Add salt and pepper as needed and serve the chili with sour cream, diced onions, diced jalapenos, fresh cilantro and lime wedges.

How to Be a Man Magnet


Lesson 1: Make my “It’s Raining Men Dip.” The minute you put this on the table, every man in a 50-mile radius will be at your house drooling over this delicious concoction.
If you already have a man, try the recipe anyway. This’ll keep him happy for a long time to come! This dip is perfect for Super Bowl Sunday, or any football day for that matter.

It’s Raining Men Dip
(aka Buffalo Chicken Dip)


1 8-ounce package cream cheese
½ cup blue cheese salad dressing (Ken’s brand is best)
½ cup Buffalo Wing Sauce (Sorry, Frank, but Ashanti brand is the best)
Salt and freshly ground pepper to taste
2-3 cups shredded cooked chicken (from a grocery store rotisserie chicken)
2 scallions, sliced (green parts only)
Celery Sticks and Tortilla Chips for Dipping

Preheat the oven to 375°F. Place the cream cheese into a medium-sized microwave safe bowl. Microwave the cream cheese for 45 seconds to soften it slightly. Whisk in the salad dressing, Ashanti Wing Sauce, Salt and Pepper until smooth. Stir in the shredded chicken until just coated (over mixing here will make your shredded chicken gummy). Spread the mixture into a 9-inch pie plate and drizzle the top with additional wing sauce, if desired. Bake the dip for 15-20 minutes, until mixture is heated through and edges are bubbly. Cool slightly and top with sliced scallions. Serve with celery and tortilla chips.

September 08, 2008

“I’m Sweet Enough Already”

That’s my silly excuse for never eating dessert. Though, the truth is, I just don’t have much of a sweet tooth and I really don’t like to bake all that much. However, every once in a while, I feel a hankering for some cake and this Reduced-Fat Lemon Blueberry Bunt Cake is my a standard “go to.”

I really made the cake for myself the other day, but I was nice and shared some with my mom, the Husband and my office girlfriend. They all gave raving reviews. See what your friends and family have to say, that is, if there are any leftovers after you cut yourself a generous piece.


Reduced-Fat Lemon Blueberry Bundt Cake

Cooking spray
2 Tablespoons sugar

3 cups all-purpose flour
1½ teaspoons baking powder
½ teaspoon baking soda
¼ teaspoon salt
1¾ cups granulated sugar
¼ cup butter, softened
1 tablespoon grated lemon rind
4 large eggs
½ teaspoon vanilla extract
1 (16-ounce) container Reduced-fat sour cream
2 cups blueberries (Fresh or Frozen)

¾ cup powdered sugar
1½ tablespoons fresh lemon juice


Preheat oven to 350 degrees. Coat a Bundt pan with cooking spray and dust it with the 2 tablespoons of granulated sugar and then set it aside. Meanwhile, combine the flour, baking powder, baking soda, and salt, stirring with a whisk. Place 1¾ cups granulated sugar, butter, and rind in a large bowl; beat with a mixer at medium speed until well blended (about 2 minutes). Add the eggs, 1 at a time, beating well after each addition (about 4 minutes total). Beat in the vanilla and the sour cream. Add the flour mixture slowly and beat at medium speed until it is just combined. Gently fold in the blueberries. Spoon the batter into the prepared pan. Bake for 1 hour and 15 minutes or until a wooden toothpick inserted in the center comes out clean. Cool the cake in the pan for about 20 minutes and then remove the cake from the pan. Cool completely on wire rack. To prepare the glaze, combine the powdered sugar and lemon juice, stirring well with a whisk. Drizzle over cooled cake.

September 05, 2008

Useless Holiday or Culinary Inspiration?

August is National Goat Cheese Month so in honor of this ever-so-important US holiday, I featured the delicious heirloom tomatoes I bought at the Baltimore Farmer’s Market in a modern caprese salad.

I know you’re thinking that I haven’t blogged in a month and this is all I came up with, but I’ve been away from home more than I have been there this summer so this is it for now. Excuses aside, this is a very yummy salad and I suggest you try it while fresh tomatoes are still available.

Goat Cheese Caprese Salad with Basil Vinaigrette


3 medium-sized fresh tomatoes (heirlooms if possible)
1 cup of fresh basil leaves
A small log of your favorite goat cheese
2 Tablespoons Extra Virgin Olive Oil
2 Tablespoons White Wine Vinegar
Salt and pepper to taste

Process the basil, olive oil and vinegar in a blender or food processor on low until everything is combined (about a minute), scraping down sides of mixer bowl as necessary. Drizzle the dressing over alternating layers of sliced tomatoes and sliced or crumbled goat cheese. Sprinkle salad with salt and pepper to taste.

August 05, 2008

Twist and Shout!

Soft pretzels are an awesome Sunday afternoon “snacktivity” to do with kids of all ages.

The twisting was a little challenging at first, but the shouting obscenities came easy when I added the baking soda to the hot water too quickly and had a 3rd grade baking soda volcano explode all over the stove (and floor, and myself, etc.). The pictures of the mess are entirely too embarrassing to post here, but the pretzels were worth the clean up effort.

The pretzels are great right out of the oven but they also store well in the freezer. The frozen pretzels make a fun accompaniment to a quick weeknight dinner salad.

Soft Pretzels:
1½ cups warm water
2 tablespoons light brown sugar
1 package active dry yeast
3 ounces butter, melted
2½ teaspoons kosher salt
4½ to 5 cups all-purpose flour

3 quarts water
¾ cup baking soda
2 whole eggs, beaten with 1 tablespoon cold water
Coarse sea salt

Line 2 half sheet pans with parchment paper and spray with cooking spray. Combine the water, sugar, yeast, and butter in the bowl of a stand mixer and mix with the dough hook until combined. Let sit for 5 minutes.

Add the salt and flour to the bowl and mix on low speed until combined. Increase the speed to medium and continue mixing until the dough is smooth and begins to pull away from the side of the bowl, about 3 to 4 minutes. If the dough appears too wet, add additional flour, 1 tablespoon at a time. Remove the dough from the bowl, place on a flat surface and knead into a ball with your hands.

Oil a bowl with a little bit of vegetable oil and add the dough to the bowl, turning to coat it with oil. Cover with a clean towel or plastic wrap and place in a warm spot until the dough doubles in size, about 1 hour.

Preheat the oven to 425 degrees F.

Bring the water to a boil in a small roasting pan over high heat and add the baking soda SLOWLY!!!!!!!

Remove the dough from the bowl and place on a flat surface. Divide the dough into about 10 equal pieces. Roll each piece into a long rope measuring about 18 inches and shape pretzels by shaping each rope into a “U”, crossing the two sides of the “U” over each other and twisting and pressing the ends down on the pretzel.

Boil the pretzels in the water/baking soda solution, 2 at a time for 30 seconds, splashing the tops with the warmed water using a spoon. Remove with a large flat slotted spatula.

Place 4 pretzels on each baking sheet and brush the tops with the egg wash and season liberally with the salt. Place into the oven and bake for 15 to 18 minutes until golden brown.

Remove to a baking rack and let rest 5 minutes before eating. Dip into desired sauces.
To reheat: Place frozen pretzels in a 400 degree oven for about 10 minutes, or until heated through.

July 09, 2008

Buried in Berries

Picking berries is one of my favorite summer activities. I’ve been doing it for as far back as I can remember with my mom, grandma, and even my great-grandma. I didn’t have any help picking from the old folks (sorry, mom!) this year but I had a record harvest nonetheless….22 pounds of strawberries and 16 pounds of blueberries!

I made some fresh jam with some of the strawberries and froze the rest of the strawberries for my favorite breakfast treat, smoothies, and pancakes and muffins in the fall.

Easy Strawberry Jam

2 cups crushed strawberries
4 cups sugar, measured into separate bowl
3/4 cup water
1 box Sure Jell Fruit Pectin
5 (1-cup) containers (washed and dried thoroughly)

Crush strawberries thoroughly, 1 cup at a time. Measure exactly 2 cups prepared fruit into a large bowl. Stir in sugar and let stand 10 minutes (stirring occasionally).

Mix water and pectin in a small saucepan. Bring to boil on high heat, stirring constantly. Continue boiling and stirring 1 minute. Add to fruit mixture and stir for at least 3 minutes or until sugar is dissolved and no longer grainy.

Fill the containers immediately to within ½ inch of tops. Wipe off top edges of containers and immediately cover with lids. Let stand at room temperature for 24 hours. Jam is now ready to use. Store in refrigerator up to 3 weeks or freeze extra containers up to a year. Thaw in refrigerator before using.

With some of the blueberries, I made the Husband’s favorite, Blueberry Turnovers.


Blueberry Turnovers

1½ cups flour
¼ cup sugar
½ teaspoon salt
2/3 cup shortening, solid vegetable, chilled, cut into small pieces
4 Tablespoons ice water

2 teaspoons cornstarch
1 teaspoon water
1½ cups blueberries
1 Tablespoon sugar

1 egg, slightly beaten

In a large bowl, mix the flour, sugar, and salt together. Using a pastry blender, cut shortening and butter into the flour mixture until coarse crumbs form. Stir in water, 1 Tablespoon at a time, tossing with a fork until a soft dough forms. Shape into a disk, wrap in plastic wrap, and chill for 1 hour.

To prepare filling, dissolve the cornstarch in the water. In a medium saucepan, heat the blueberries and the sugar over medium heat, stirring occasionally, until the mixture comes to a boil. Add the cornstarch mixture, stirring constantly until thickened. Remove from heat and cool .

Preheat oven to 400 degrees.

On a floured surface, using a floured rolling pin, roll dough to a 1/8" thickness. Cut out about 5-6 6" circles. Spoon the filling evenly into the center of each circle, careful not to overstuff the pastry rounds. Fold the dough over the filling and then press the edges together with a fork to seal.

Place turnovers on baking sheet and brush with the beaten egg. Sprinkle pearled sugan on top if you have it. Bake the turnovers until golden brown about 30 minutes. When done, transfer the turnovers to a wire rack to cool.

Garnish with fresh blueberries and mint sprigs.

June 19, 2008

No Freedom Fries Here

In Paris, crepes are basically street food, but here in Baltimore a few nights ago, they were a delicious dinner for deux.

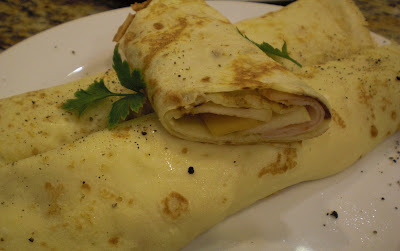
I’ve been on a quasi-vegetarian kick recently so I sautéed some baby Portabella ‘shrooms and onions for my crepes and made the Husband Turkey, Cheddar and Apple Crepes. Oui, oui, oh la la, Bon Apetit…Whatever the French say, I don’t know, but I do know that these were a quick and easy meal.

Finally, despite the French-themed dinner, we complimented the meal with some good California Chardonnay. We try to Buy American as often as possible and encourage you to do the same!

Savory Crepes Deux Ways

1 cup milk
1 cup all-purpose flour
2 eggs, slightly beaten
1 teaspoon cooking oil
¼ teaspoon salt

Assorted Fillings:
Turkey Breast (Turkey Cold Cuts from the deli are fine)
Sharp Cheddar Slices
Apple Slices (sliced very thin)
Sautéed Mushrooms and Onions
Swiss Cheese Slices

Combine all ingredients in a blender container. Cover and blend until smooth.

Heat an 8-inch skillet over medium-high heat and when hot, spray with cooking spray. Next, pour 3 Tablespoons of the batter into the center of skillet. Lift the pan up and rotate and tilt it to spread the batter over the bottom of the pan (work quickly). Return to the heat and cook for about 1-2 minutes (until light brown and ends lift up easily). Turn over with a spatula, (or by hand if you have tough fingers) and cook the second side for about 30 seconds to 1 minute.

Slide the finished crepes onto paper towels while you’re cooking the rest of the batter. When all crepes are done, layer the fillings into center and roll/fold the crepes and sprinkle the crepes with salt and freshly cracked pepper. Makesabout 8-10 crepes.

June 12, 2008

Fava Beans and a Nice Chianti

I saw these giant beans in the store the other day and knew that these were something I wanted to try.
The beans were time consuming to prepare-- you need to peel them, boil them and then peel them again--but in the end, they were worth the effort. Thanks for the inspiration, Hannibal Lecter, but we didn’t eat a Census Taker’s liver with the beans--Salmon sounded a little more appetizing.

Seared Salmon with Sauté of Fava Beans, Fresh Corn and Tomatoes


2 Wild-Caught Salmon Filets
Spice blend made from ¼ teaspoon paprika, ¼ oregano, ¼ teaspoon of garlic powder and 1 dash of cayenne pepper.

¾ cup of fresh, shelled, fava beans (from about 10-12 pods)
1 ear of fresh white corn, kernels cut off the ear
2 ripe Roma tomatoes, diced
1 small onion, minced
2 cloves garlic, minced
salt and pepper to taste

Preheat oven to 375. Dry the salmon filets with paper towels, and sprinkle them with the spice mix.

Meanwhile, heat about 1 Tablespoon of extra virgin olive oil in a sauté pan over medium heat and sauté garlic and onions until onions are lightly browned.

While onions are cooking, heat an oven safe sauté pan over medium-high heat. Add some olive oil, and when the oil is almost smoking, add the salmon filets, skin side up. Let cook for about 2-3 minutes, or until the salmon easily lifts from the pan. Using a metal spatula, gently turn salmon filets over and place the pan in oven for about 5 minutes.

Next, add corn, fava beans, tomatoes, and a few dashes of salt and pepper to the sautéed onions and garlic, and stir mixture gently until heated through.


Serve with some crusty bread, and of course, a nice Chianti. Hannibal Lecter sucking noises optional.